singer 6180 brilliance sewing machine manual
Singer 6180 Brilliance Sewing Machine Manual: Article Plan
This comprehensive article details navigating the Singer 6180 Brilliance manual, covering access, understanding its structure, troubleshooting, and essential maintenance procedures.
We’ll explore both digital and physical manual locations, including the Internet Archive, and address the availability of a Spanish language version for broader accessibility.
Furthermore, the plan outlines sections on machine parts identification, basic and advanced sewing techniques, and vital safety precautions for optimal performance.
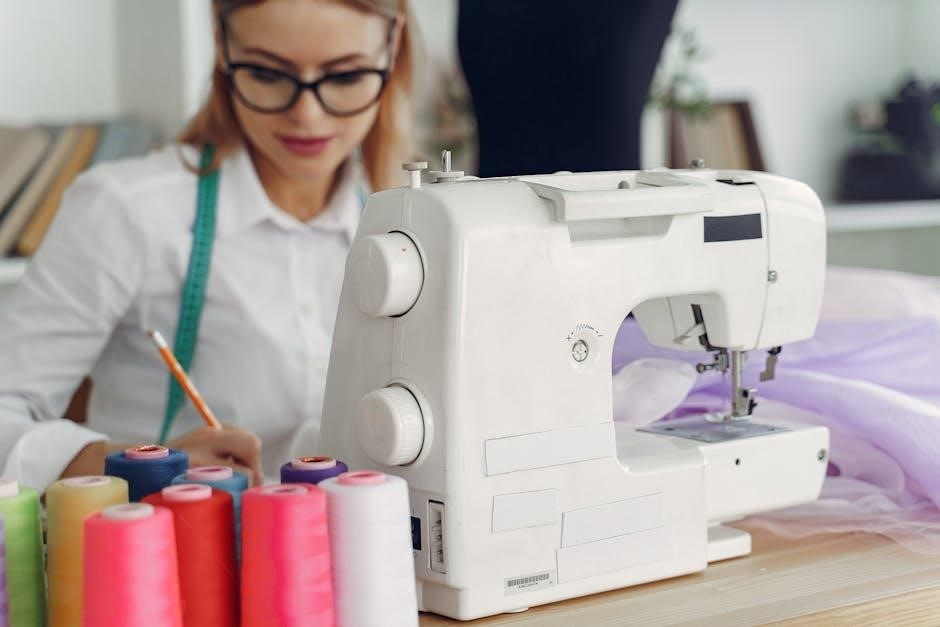
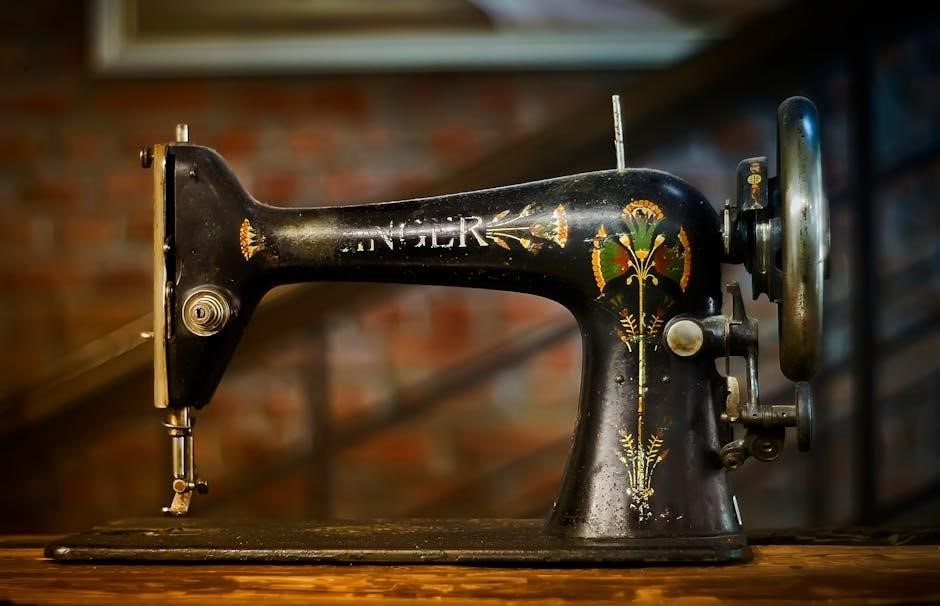
The Singer 6180 Brilliance is a popular electronic sewing machine renowned for its versatility and user-friendly design. Released as part of Singer’s Brilliance series, this machine caters to both beginners and experienced sewists, offering a wide range of stitch options and features. Understanding its capabilities begins with a thorough grasp of the accompanying manual, a crucial resource for unlocking the machine’s full potential.
This machine, alongside models 6199 and 6160, boasts a helpful tip within its documentation: a slight tension adjustment – either side of the ‘5’ setting – can significantly improve stitch appearance. Most sewing will be optimal with the tension control set to 5. The 6180 Brilliance is designed for diverse projects, from simple alterations to complex garment construction. Accessing the correct manual, whether in digital PDF format or a physical copy, is the first step towards successful sewing with this machine.
The availability of both English and Spanish language manuals ensures accessibility for a wider user base, making it a truly inclusive sewing solution.
Overview of the Machine’s Features
The Singer 6180 Brilliance excels with its electronic controls and a comprehensive selection of stitches, designed to tackle a broad spectrum of sewing projects. Key features include adjustable stitch length and width, allowing for customization based on fabric type and desired aesthetic. The machine offers various buttonhole styles, simplifying garment construction. Its free-arm capability facilitates easy sewing of cuffs, sleeves, and other cylindrical shapes.
The 6180’s bobbin winding system, now positioned to the right during operation, ensures smooth and consistent thread delivery. The machine’s parts list, detailed in documentation dated October 25, 2010, includes components like clip-on washers and securing plates, vital for maintaining optimal performance.
Furthermore, the machine’s instruction manual, available in both English and Spanish, provides guidance on utilizing these features effectively, ensuring a seamless sewing experience for users of all skill levels.
Where to Find the Manual (Digital & Physical)
Locating a Singer 6180 Brilliance manual can be achieved through several avenues. Originally, a physical copy would have accompanied the machine purchase. However, if misplaced, digital options are readily available. The Internet Archive hosts a downloadable PDF version, offering free access to the 64-page user guide, uploaded on August 19, 2020.
Directly searching “Singer 6180 user manual” on the Internet Archive yields multiple download formats, including PDF, JP2 ZIP, and TORRENT options. A Spanish language manual is also accessible, catering to a wider user base. Online sewing communities and forums may also host copies or provide links to reliable sources.
Checking Singer’s official website, while not always providing direct downloads for older models, can sometimes offer support or links to relevant resources.
Downloading the Manual from the Internet Archive
The Internet Archive provides a straightforward method for obtaining a digital copy of the Singer 6180 Brilliance sewing machine manual. A quick search for “Singer 6180 user manual” reveals numerous download options. Users can choose from a single PDF download, a SINGLE PAGE PROCESSED JP2 ZIP file, or utilize a TORRENT download for faster access.
Currently, 18 files are available, including 6 Original files, offering flexibility in how you access the information. The PDF version, approximately 5.47 Mb in size, is a complete copy of the manual. The site’s interface is user-friendly, allowing for easy navigation and selection of the desired file format.
Access is free, requiring no registration or subscription. This makes the Internet Archive a convenient and reliable resource for Singer 6180 owners seeking guidance.
Accessing the Spanish Language Manual
For Spanish-speaking users, a complete Singer Brilliance 6180 manual is readily available in Spanish. This Manual de Usuario spans 64 pages and provides comprehensive instructions for operating the sewing machine. It covers everything from identifying machine parts to detailed guidance on both hand and machine sewing techniques.
The manual specifically details how to perform various stitch types and offers valuable insights into achieving optimal sewing results. It’s a valuable resource for those more comfortable with instructions in Spanish, ensuring a clear understanding of the machine’s functionalities.
Several online sources host this Spanish version in PDF format, making it easily downloadable and accessible. This ensures all users, regardless of language preference, can fully utilize their Singer 6180 Brilliance.
Understanding the Manual’s Structure
The Singer 6180 Brilliance sewing machine manual is logically organized for ease of use. It begins with a detailed parts list, crucial for identifying components during setup and maintenance. Following this, sections cover fundamental operations like winding the bobbin and threading the machine, presented with clear diagrams.
Subsequent chapters delve into sewing techniques, progressing from basic straight and zigzag stitches to more advanced methods like buttonholes and zipper insertion. A dedicated troubleshooting section addresses common issues like thread breakage and tension problems, offering practical solutions.
The manual also emphasizes regular maintenance, outlining cleaning and oiling procedures to ensure longevity. Its structure facilitates quick reference, allowing users to efficiently find information as needed, maximizing their sewing experience.
Machine Parts Identification
Identifying key components of the Singer 6180 Brilliance is essential for operation and maintenance. The manual provides detailed diagrams labeling each part, from the power switch and handwheel to the presser foot and bobbin winder. Specific parts like the clip-on washer (270 010963) and securing plate (270 066235) are individually referenced in the parts list.
Understanding the function of each component is equally important. For example, the thrust washer (270 043389) and spring pin (270 043930) contribute to smooth mechanical operation. The manual’s comprehensive approach ensures users can accurately locate and understand the purpose of every part, facilitating repairs and adjustments.
Referencing the 6180 parts list within the manual streamlines the identification process, ensuring accurate component recognition.
Key Components and Their Functions
The Singer 6180 Brilliance relies on several key components working in harmony. The needle, driven by the machine’s motor, pierces fabric to create stitches. The presser foot maintains fabric tension, ensuring even stitch formation. The bobbin, housed below the needle plate, interlocks with the upper thread to form the stitch.
The tension dial controls the balance between upper and lower threads, crucial for stitch quality. The handwheel allows manual control for precise stitching, while the bobbin winder prepares additional bobbins. The manual emphasizes the importance of proper threading and bobbin insertion for optimal performance.
Understanding these functions is vital for troubleshooting and achieving desired sewing results.
Detailed Parts List (Referencing 6180 Parts List)
The Singer 6180 Brilliance parts list is extensive, detailing each component for repair and maintenance. Key items include the clip-on washer (Part Number 270 010963) and the thrust washer (270 043389), essential for smooth operation. A spring pin (270 043930) secures vital mechanisms, while various washers (416459701) ensure proper alignment and reduce friction.
The securing plate (270 066235) and other components (270 066437) contribute to the machine’s structural integrity. This list, dated October 25, 2010, provides precise part numbers for accurate ordering. Accessing this detailed list is crucial when replacing worn or damaged parts, ensuring compatibility and maintaining the machine’s functionality.
Referencing the manual’s parts diagram alongside this list simplifies identification and repair processes.
Setting Up the Machine
Proper setup is crucial for optimal performance of the Singer 6180 Brilliance. Begin by winding the bobbin, ensuring it’s correctly positioned on the bobbin winder – moved to the right for operation during sewing. Next, carefully thread the upper thread, following the numbered guides illustrated in the manual.
Accurate threading prevents tension issues and ensures consistent stitch quality. Finally, insert the bobbin into its case, again referencing the manual’s diagrams for correct orientation. A properly inserted bobbin is vital for forming balanced stitches.
Double-check all steps before starting to sew, as incorrect setup can lead to thread breakage or uneven stitching.
Winding the Bobbin
Winding the bobbin correctly is a foundational step for successful sewing with the Singer 6180 Brilliance. First, place the thread spool on the spool pin. Then, guide the thread through the thread guides designated for bobbin winding, as detailed in the manual.
Next, position the bobbin onto the bobbin winder spindle. Ensure it clicks securely into place. Engage the bobbin winder by sliding it to the right (the operating position) – this action is crucial during the sewing process.
Press the foot pedal gently to begin winding. The machine will automatically stop when the bobbin is full. Disengage the bobbin winder and remove the filled bobbin.
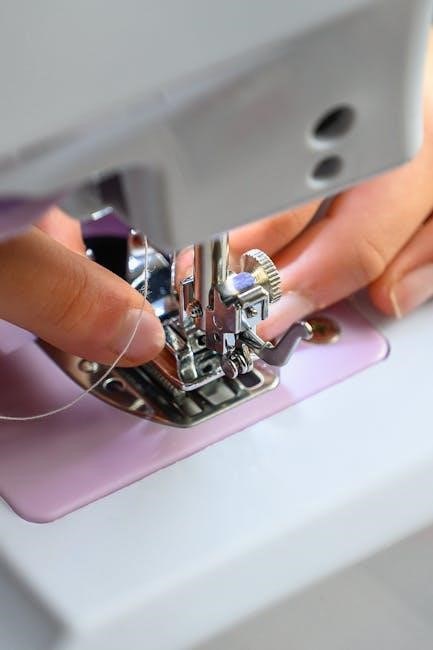
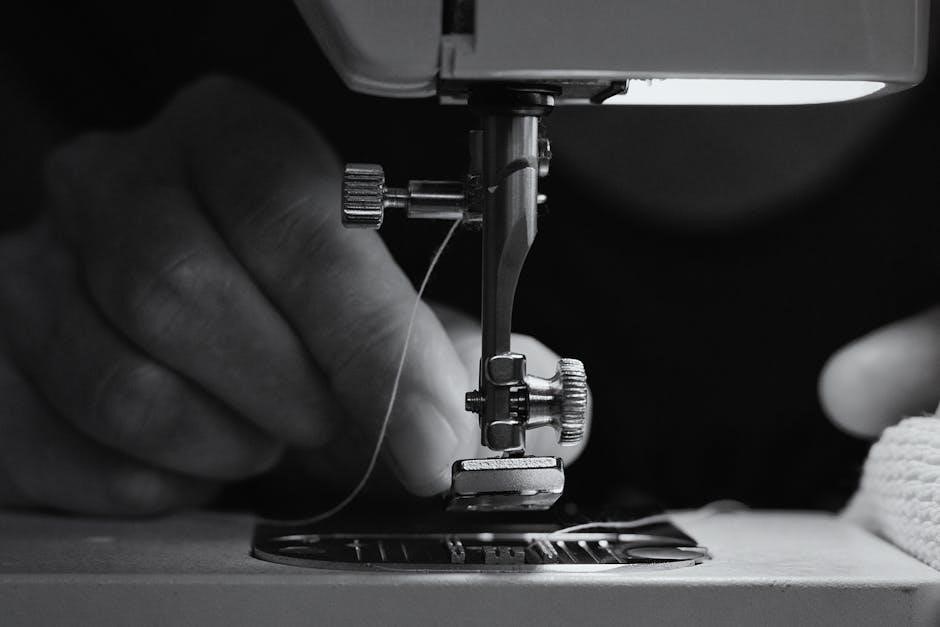
Threading the Upper Thread
Proper upper threading is essential for consistent stitch formation on the Singer 6180 Brilliance. Begin by raising the presser foot; this opens the tension discs, allowing the thread to enter freely. Place the spool of thread on the spool pin.
Next, follow the numbered threading path illustrated in the manual, guiding the thread through each guide and around the tension discs. Ensure the thread is securely seated within the tension assembly.
Continue threading the take-up lever, then through the wire guide, and finally, thread the needle from front to back. A correctly threaded machine will ensure smooth and even stitching, preventing issues like thread breakage or skipped stitches.
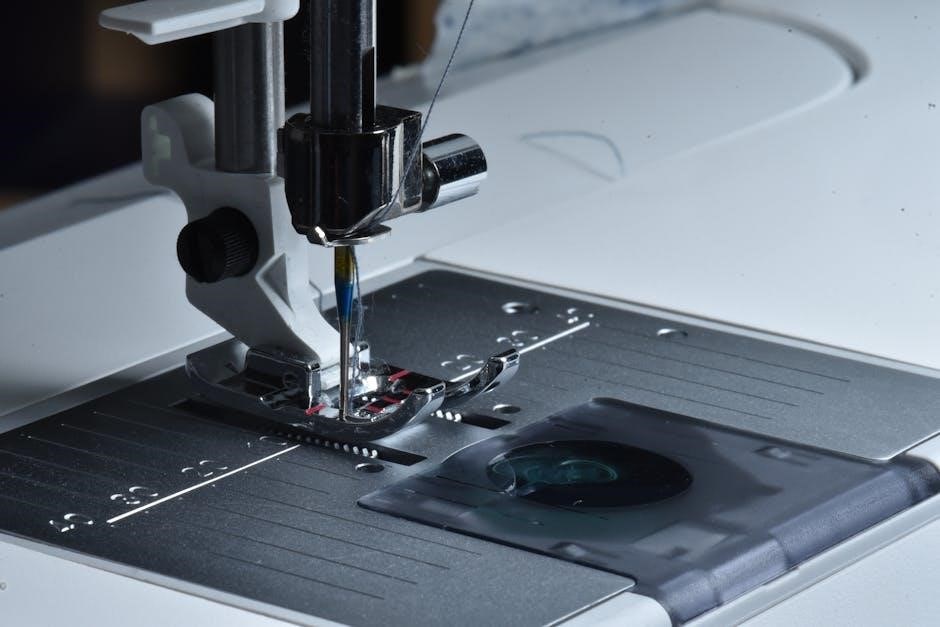
Inserting the Bobbin
Correct bobbin insertion is crucial for the Singer 6180 Brilliance’s sewing performance. After winding the bobbin, locate the bobbin case beneath the needle plate. Gently open the bobbin cover.
Insert the bobbin into the bobbin case, ensuring the thread unwinds in the correct direction – typically counter-clockwise. Guide the thread through the tension spring of the bobbin case, and then through the slot.
Close the bobbin cover securely. To ensure proper threading, gently pull on the upper thread; this should bring the bobbin thread up through the needle plate. Correct bobbin insertion prevents issues like bird’s nesting and uneven stitches.
Basic Sewing Techniques
Mastering fundamental techniques unlocks the Singer 6180 Brilliance’s potential. Begin with straight stitching, the foundation of most sewing projects. Select a straight stitch setting, adjust the stitch length according to your fabric, and guide the fabric evenly under the presser foot.
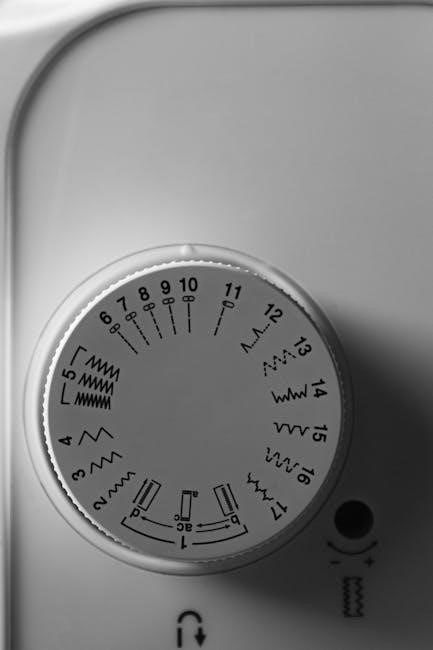
Next, explore zigzag stitching, ideal for finishing raw edges and creating decorative effects. Choose a zigzag stitch pattern and adjust the stitch width. Experiment with different settings to achieve desired results.
Understanding stitch length and width adjustments is key. Shorter stitch lengths are suitable for delicate fabrics, while longer lengths work well for heavier materials. Adjusting width alters the zigzag’s breadth, offering versatility.
Straight Stitching
The Singer 6180 Brilliance excels at straight stitching, a cornerstone of sewing. To begin, select the straight stitch option on the machine’s stitch selection dial. Adjust the stitch length based on your fabric; a shorter length (around 2.5) is ideal for lightweight materials, while a longer length (around 3.0) suits heavier fabrics.
Thread the machine correctly, ensuring the upper thread is properly seated in the tension discs and the bobbin is inserted correctly. Practice guiding the fabric smoothly under the presser foot, maintaining a consistent speed. A seam guide can aid in achieving straight, even seams.
Pay attention to the tension; a balanced tension creates a neat, even stitch. If the thread loops or puckers, adjust the tension dial slightly. Consistent practice will refine your straight stitching skills.
Zigzag Stitching
The Singer 6180 Brilliance’s zigzag stitch offers versatility for various applications, from finishing raw edges to creating decorative designs. Select the zigzag stitch on the stitch selection dial and adjust both the stitch width and length. A wider stitch is suitable for preventing fabric fraying, while a narrower stitch is ideal for appliqué.
Experiment with different width and length combinations to achieve desired effects. For stretch fabrics, a slightly longer and wider zigzag provides necessary give. Ensure proper threading and tension for a balanced stitch. Guide the fabric evenly under the presser foot, avoiding pulling or pushing.
Zigzag stitching is also useful for buttonholes (though a dedicated buttonhole foot is recommended) and reinforcing seams. Practice on scrap fabric to master control and achieve consistent results.
Adjusting Stitch Length and Width
The Singer 6180 Brilliance allows precise control over stitch length and width, crucial for adapting to different fabrics and sewing tasks. Locate the length and width dials – typically positioned near the stitch selection dial. Rotating the length dial adjusts the distance between each stitch, impacting seam strength and appearance.
Shorter stitch lengths are ideal for delicate fabrics or areas requiring increased durability, while longer lengths are suitable for basting or gathering. The width dial controls the side-to-side deviation of the needle, affecting zigzag stitch appearance and fabric edge finishing.
Always test settings on scrap fabric before sewing your project. A small adjustment, even to the side of ‘5’, can significantly improve stitch quality. Remember the 90% of your sewing will be done with tension set to ‘5’.
Advanced Sewing Techniques
The Singer 6180 Brilliance expands beyond basic stitches, offering capabilities for more complex projects. Mastering buttonhole sewing requires utilizing the designated buttonhole foot and following the manual’s step-by-step instructions for consistent, professional results. Zipper insertion benefits from a zipper foot, allowing close stitching along the zipper teeth.
While the 6180 is primarily a domestic machine, it can perform a functional overlock stitch (if applicable, check your manual’s stitch options) to prevent fabric fraying. Experiment with decorative stitches to add unique embellishments to your creations.
Refer to the manual for specific foot recommendations and stitch settings for each technique. Practice on scrap fabric is essential before applying these skills to your final project, ensuring a polished finish.
Buttonhole Sewing
The Singer 6180 Brilliance simplifies buttonhole creation with its dedicated buttonhole foot and automated settings. Begin by selecting the appropriate buttonhole stitch on the machine, referencing the manual for stitch number and recommended settings. Attach the buttonhole foot, ensuring it clicks securely into place.
Measure the button size accurately and adjust the buttonhole length accordingly using the dial or digital controls. Place the button under the presser foot, aligning it with the designated markings. Carefully lower the presser foot and begin sewing, allowing the machine to automatically stitch the buttonhole outline.
The manual provides detailed diagrams illustrating the process. Practice on scrap fabric to perfect your technique before working on your garment. Consistent results depend on accurate measurements and proper foot attachment.
Zipper Insertion
The Singer 6180 Brilliance offers several methods for zipper insertion, detailed within the manual. Utilizing the zipper foot is crucial for achieving professional results. Select the appropriate zipper foot – either the standard or invisible zipper foot – based on the zipper type.
Pin the zipper tape to the fabric, ensuring the zipper teeth are aligned with the fabric edge. Lower the presser foot and begin sewing close to the zipper teeth, guiding the fabric evenly. The manual illustrates different techniques for centered, lapped, and invisible zippers.
Adjust stitch length as needed for optimal zipper attachment. Practice on scrap fabric to master the technique before applying it to your project. Consistent pressure and a slow, steady pace are key to a smooth, even zipper insertion.
Overlock Stitching (if applicable)
The Singer 6180 Brilliance, while versatile, does not feature a dedicated overlock stitch. However, a sufficiently narrow zigzag stitch can simulate an overlock finish, preventing fabric fraying. Consult the manual for recommended zigzag width settings to achieve a close approximation of an overlock.
Utilize a zigzag foot for optimal results when employing this technique. Practice on scrap fabric to determine the ideal stitch width and length for your specific fabric type. Ensure consistent fabric feeding to maintain a uniform overlock-like edge.
For projects requiring a true overlock finish, consider using a serger or seeking professional finishing services. The manual emphasizes the limitations of the zigzag simulation and suggests alternative solutions for demanding applications.
Troubleshooting Common Issues
The Singer 6180 Brilliance manual dedicates a section to resolving frequent sewing problems. Thread breakage is often caused by incorrect threading, a dull needle, or improper tension. Re-thread the machine carefully, replace the needle, and adjust the tension dial – starting with a setting of 5 as recommended.
Needle breakage typically stems from forcing the fabric, using the wrong needle type for the material, or a bent needle. Always use the appropriate needle size and type, and avoid pulling the fabric while sewing. Inspect the needle regularly for damage.
Tension issues result in uneven stitches. The manual advises a starting point of 5 for the upper tension. Adjust in small increments, testing on scrap fabric after each change. Consistent tension is crucial for a professional finish.
Thread Breakage Problems
The Singer 6180 Brilliance manual identifies several causes for thread breakage. Incorrect threading is a primary culprit; ensure the thread path is clear and the thread is properly seated in all guides and the tension discs. A dull or damaged needle significantly increases the risk, necessitating frequent replacement.
Improper tension settings also contribute. Begin with the recommended tension of 5 and adjust incrementally, testing on scrap fabric. Using low-quality thread can lead to frequent breaks; opt for reputable brands. Ensure the bobbin is wound evenly and correctly.
Finally, attempting to sew through excessively thick fabric or multiple layers can strain the thread. Reduce the fabric thickness or use a heavier-duty needle and thread combination.
Needle Breakage Solutions
The Singer 6180 Brilliance manual highlights several reasons for needle breakage. Bending or damaging the needle during fabric manipulation is a common cause; always handle needles with care. Using the incorrect needle type for the fabric is critical – heavier fabrics require stronger needles.
Incorrect threading, similar to thread breakage, can strain the needle. Verify proper threading through all guides. Attempting to sew over pins is a major risk; remove pins before the needle reaches them. Excessive speed can also contribute; reduce sewing speed for thicker materials.
Ensure the needle is fully inserted and securely tightened. A misaligned needle can cause breakage; re-insert the needle carefully. Finally, forcing the fabric can lead to needle failure; let the machine feed the fabric naturally.
Tension Adjustment Guide (Setting to 5)
The Singer 6180 Brilliance manual emphasizes that a tension setting of 5 is generally optimal for 90% of standard sewing applications. This provides a balanced stitch with consistent top and bobbin thread interlock. However, adjustments are sometimes necessary based on fabric type and thread weight.
If loops form on the underside of the fabric, increase the upper tension (move towards higher numbers). Conversely, if loops form on the top, decrease the upper tension. Small adjustments are key – a slight turn can make a significant difference.
The manual notes a “useful tip” regarding minor adjustments; a small tweak to either side of 5 can improve stitch appearance. Always test on a scrap fabric before sewing your project to ensure proper tension.
Maintenance and Care
Regular maintenance is crucial for the longevity and performance of your Singer 6180 Brilliance. The manual stresses the importance of consistent cleaning to remove lint and debris from the bobbin area and feed dogs. This prevents jams and ensures smooth fabric feeding. Use a soft brush or vacuum attachment – avoid compressed air, which can push debris further inside.
Oiling the machine is also essential, focusing on designated oiling points as indicated in the manual. Use sewing machine oil only; other lubricants can cause damage. A regular maintenance schedule, including cleaning after each use and oiling every few months, is recommended.
Proper care extends the machine’s life and maintains stitch quality. Always cover the machine when not in use to protect it from dust.
Cleaning the Machine
Consistent cleaning is paramount for maintaining your Singer 6180 Brilliance. Begin by disconnecting the power supply before any cleaning procedure. Focus on removing lint and thread debris from the bobbin area, using a soft brush – a small paintbrush works well – to dislodge accumulated fluff. Avoid using compressed air, as it can force particles deeper into the mechanism.
The feed dogs beneath the presser foot also require regular attention. Brush away any lint that accumulates there, ensuring smooth fabric movement. Wipe down the exterior surfaces with a slightly damp cloth, avoiding harsh chemicals or abrasive cleaners.
Regular cleaning prevents jams, ensures optimal stitch quality, and prolongs the machine’s lifespan. Make it a habit to clean after each sewing session for best results.
Oiling the Machine
Proper lubrication is crucial for the Singer 6180 Brilliance’s smooth operation. Use only sewing machine oil, as other lubricants can damage internal components. Locate the oiling points as indicated in your manual – typically around the bobbin area, hook, and any moving parts. Apply oil sparingly, one drop at a time, to avoid over-oiling which can attract lint.
After oiling, operate the machine slowly for a few minutes to distribute the oil evenly. Wipe away any excess oil with a clean, lint-free cloth. Avoid oiling the tension discs, as this can affect stitch quality.
Regular oiling reduces friction, prevents wear and tear, and ensures quiet, efficient sewing. Consult your manual for the recommended oiling frequency, typically after every few hours of use.
Regular Maintenance Schedule
Maintaining your Singer 6180 Brilliance extends its lifespan and ensures optimal performance. After each use, brush away lint from the bobbin area and feed dogs. Monthly, thoroughly clean the machine, including the needle plate and surrounding areas, using a soft brush and lint remover.
Every six months, oil all designated lubrication points as detailed in the manual. Annually, consider a more comprehensive cleaning, potentially including a professional servicing. Inspect the power cord for damage and replace if necessary.
Regularly check the needle for wear and tear, replacing it as needed. Following this schedule minimizes issues and keeps your Singer 6180 running smoothly for years to come.
Safety Precautions
Prioritize safety when operating your Singer 6180 Brilliance. Always disconnect the machine from the power source before threading, changing the needle, or performing any maintenance. Never sew over pins, as this can damage the needle and machine. Keep fingers away from the needle while sewing.
Use only genuine Singer accessories to prevent damage or malfunction. Ensure the machine is placed on a stable, level surface during operation. Do not attempt to repair the machine yourself if you are not qualified; seek professional assistance.
Keep the power cord away from heat and sharp edges. Supervise children when the machine is in use. Following these precautions ensures a safe and enjoyable sewing experience.
Additional Resources
For further assistance with your Singer 6180 Brilliance, explore the wealth of online resources available. The Internet Archive hosts downloadable manuals, including the Spanish version, offering comprehensive guidance. Singer’s official website may provide FAQs, troubleshooting tips, and accessory information.
Online sewing communities and forums are excellent platforms to connect with fellow enthusiasts, share experiences, and seek advice. YouTube tutorials demonstrate various techniques and maintenance procedures specific to this model. Remember to search using keywords like “Singer 6180” or “Brilliance sewing machine.”
Local sewing machine repair shops can offer professional servicing and support. Utilizing these resources will enhance your sewing journey and ensure your machine’s longevity.
Leave a Reply
You must be logged in to post a comment.